Isn’t there an app for that? The ongoing hype in mobile app markets, such as iTunes, Google’s Play, Amazon or Microsoft’s phone market strongly increases the need for mobile advertising technologies. Due to the massive increase of mobile apps and the inflationary development of prices for these mobile pieces of software, many developers and publishers try to build their business model on mobile advertising. App publishers tend to follow several main strategies, in order to gain profit out of their developments. These strategies changed a lot over the last years, adapting to this fast changing market. The first app publishers that appeared on iTunes gained a lot of profit for just offering the first available app in the market. Times have changed, today app marketplaces represent the most challenging and competitive grounds worldwide. There surely exist hundreds of similar apps from rivaling publishers, for each purpose you can think of.
So if you are planning to make a lot of money by selling apps in global marketplaces, you definitely need a good strategy.
This reminds me on the three different ways to be successfull on Wall Street, that Jeremy Irons recited in the excellent film Margin Call, before he ordered to crash the market by selling trash values:
According to Margin Call, there are three ways to make a living in that business:
- Quick: You are the first with an excellent new business idea, or the first that creates a completely new service or a new market for something.
- Smart: You are offering the best solution for a problem on the market, your features are the most fancy ones, you offer more features than your competitors and you solve technical problems that your competitors are not able to solve.
- Cheat: You are offering something that is not within the legal market, such as PirateBay did or lately Megaupload. (Jeremy Irons did argue that he does not want to cheat and that it is a lot easier to be quick than smart) 😉
Beside this basic rules for making business in global markets, there are some common selling strategies that most of the successful publishers follow:
- Payment model: The downside of this approach is that the price a customer is willing to pay for an app fall below 1$ within the last years. So you have to sell a huge amount of apps to even finance your own costs. Beside that you have to offer a lot more benefits than your free competitors. Perform a market research what your competitor offers and if there exists a premium payversion of similar apps.
- Freemium model: A so called freemium model consists of a free basic version of your app, offering enough features to give the customer a real good product and an additional paid premium part that adds some more useful features. Often this freemium model is connected with so called in-app sales where the basic app is completely free of charge, while the user has the possibility to buy some extra features inside your app. An example is TripWolf, a very popular mobile community travel guide, that offers additional paid travel guides.
- Advertising model: Within the advertising model the publisher tries to make a living just with showing paid third party advertisements or product placements. The revenu much depends on the traffic (number of advertisement views) you can achieve with your mobile app. For me the rules for successful mobile advertising are much the same as for standard Web-sites. Mobile apps have to attract the user long enough to show him some advertisements. While it is easy for a travel guide app to attract the user for a longer time period, it could be realy hard for a small and hidden tool app.
In this article i will take a closer look at the actual technologies for mobile advertising and on their future development.
A state-of-the-art method is to use context-information, such as the location, time or even the activities the user is occupied with. Modern advertising platforms for example consider the user’s platform, location or language within their mobile adverts. As a very personal tool your smartphone is able to deliver a lot information that possibly increase the impact of advertisements. Depending on the details the user is willing to share with the advertising operators, (such as Google) mobile ads are completely customized to target an individual person.
The mobile market is shared between several big players (Apple iOS, Google Android, Microsoft Phone, RIM Blackberry, Nokia Symbian and Maemo, …). It is hard for developers to decide which of these platforms will be favoured by the users in the future. Within this extremely fast changing market, trends can significantly change within months. In consequence of this situation, the mobile advertising technologies have to support a multitude of different mobile target platforms and should be open for future changes.
One example for such an open advertising platform is AdMob. AdMob is one of the prominent technology providers for mobile advertising within the Android dominated markets. AdMob was founded in San Mateo, California in 2006 and was quickly aquired by Google in 2009 for around $700 million. At the moment AdMob is one of the largest worldwide providers for mobile adverts by serving around 2 billions ad requests a day (Jan. 2011). AdMob supports various platforms, such as of course Android but as well iOS and mobile Web pages on different platforms. Developers can easily create mobile advertising campaigns within the AdMob Web portal and copy and paste the necessary advertising mobile code into their applications. The generated advertising code is available for a multitude of different technologies (JSP, PHP, .NET, CGI, …).
In order to integrate the mobile adverts into your mobile apps, AdMob offers different SDKs and code snipplets for all major mobile platforms.
Following example shows step-by-step how to integrate an AdMob advertisement into your Android app:
Step 1: AdMob Registration
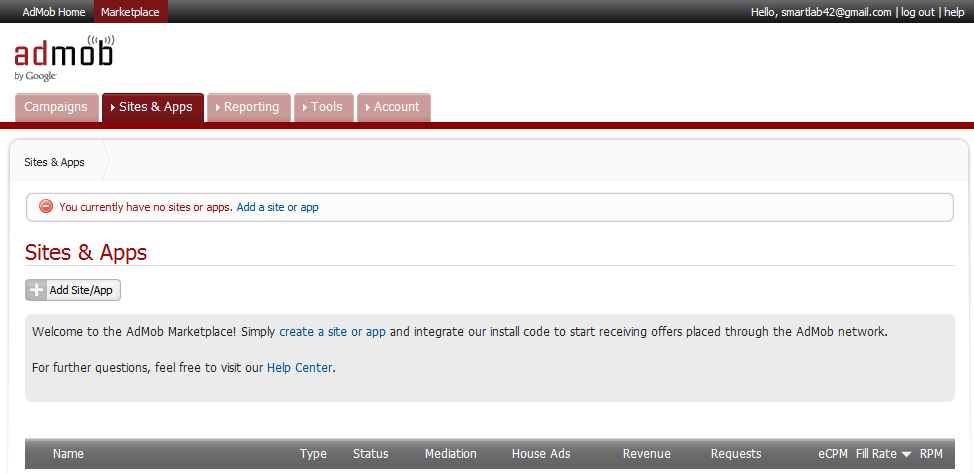
If you are not already registered at AdMob, just visit the AdMob Web portal and create a new account. After the registration process you can see your empty AdMob dashboard, that normally shows a list of your advertising campains, traffic and profit statistics. The screenshot below shows an empty AdMob dashboard:
Step 2: Create a new AdMob Site/App
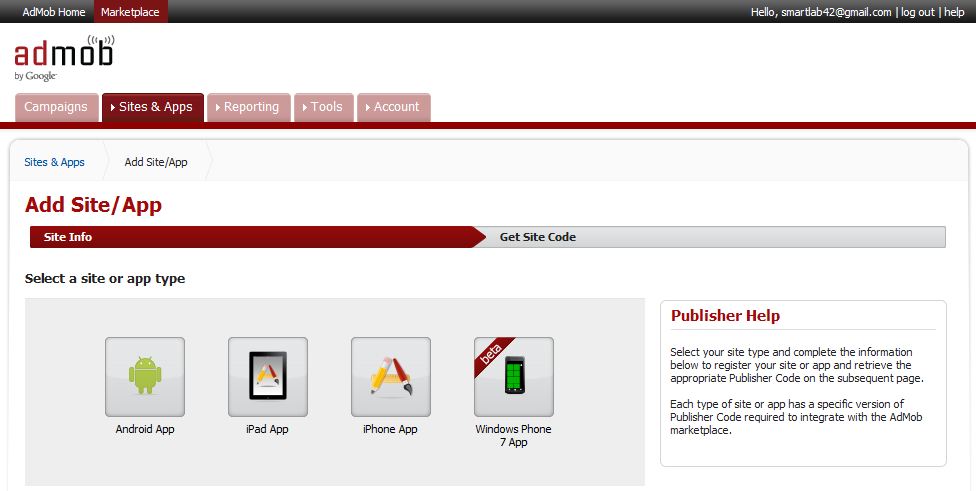
Create a new site by clicking the button ‘Add Site/App‘. Now the AdMob wizard provides an overview about the available and supported classes of apps and sites, as it is shown by the screenshot below:
AdMob supports several different classes of applications, such as Android Apps, iPad and iPhone apps, HTML5 apps as well as Windows Phone 7 apps.
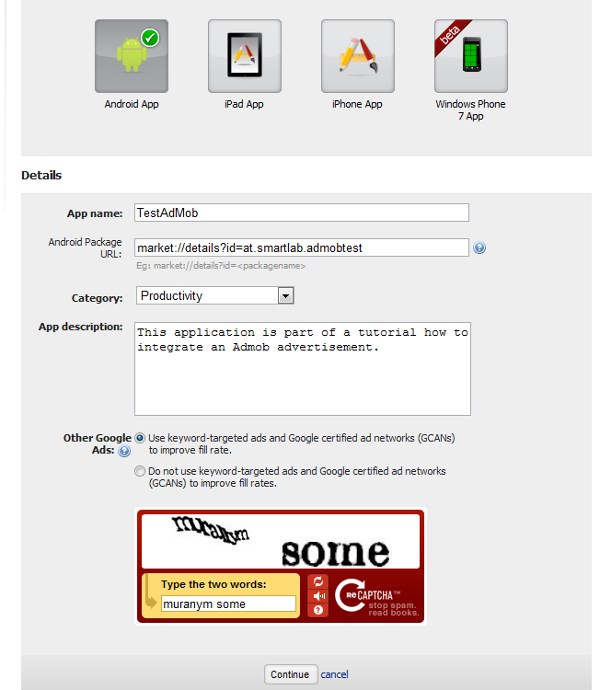
Within this tutorial we will integrate an AdMob advertisement into an Android app, so we press the button ‘Android App’. In order to create a new Android app we have to add some additional information to describe the intended application in detail. We have to specify a name for the application (TestAdMob) and we have to enter an URL that identifies an application. Admob recommends following strategy for choosing the identifying URL:
AdMob recommends using the following URL format for linking to an App in the Android Market: market://details?id=<package-name>
We have found that routing users to the “Details” page of an app has the best results for driving app downloads. The Android Market will always display the “Details” page for the latest version of the application.
If you are linking to an Android App that is not in the Android Market, you may use http://
Step 3: Download and install AdMob Android SDK
The AdMob Android SDK allows the developer to seamlessly integrate an advertisement within an Android based application. Download and unzip the Android jar archive (googleadmobadssdkandroid.zip). The archive contains the AdMob Android SDK for integrating an ad view into your Android user interface layouts (GoogleAdMobAdsSdk-6.1.0.jar), as well as the Google Analytics Android SDK (libGoogleAnalyticsV2.jar).
Step 4: Configure your AdMob Advertisement
As you have finished the creation process of your AdMob advertisement for Android based platforms, it appears within your AdMob dashboard.
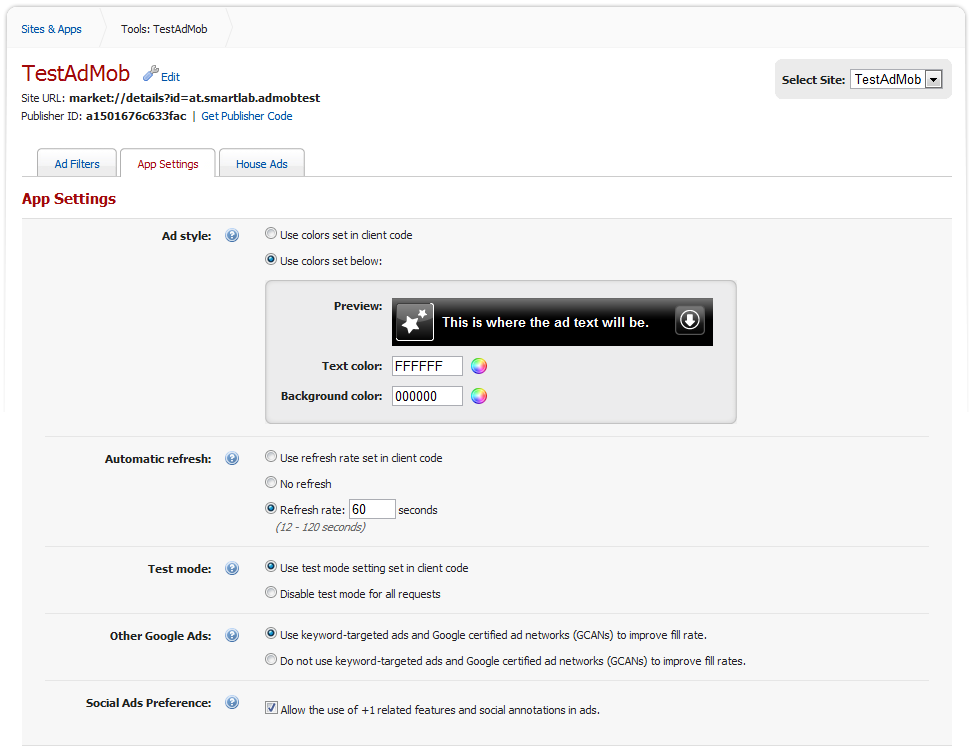
By clicking on the ‘Manage Settings’ button of your TestAdMob advertisement a configuration page is shown, where the ads appearance, URL filters and other minor options can be set. Another important information here is the AdMob Publisher ID (on the next screenshot on the top left corner) which can be found also within this configuration screen. You need this Publisher ID within your Android application’s Java code to create the logic link between the generated advert and your application. The configuration screen is shown below:
Step 5: Let AdMob fill your Android App with paid advertisements
Start Eclipse and create a new Android based Java application.
Create a /libs folder directly within the root folder of your Android project folder and copy the AdMob Android SDK jar into that folder. Right click on your project and add this library to your projects build path by selecting Build Path > Add External Archive…
The sample application consists of a simple main layout that contains a single TextView. Now we are going to modify this simple layout to contain an AdView. Therefore we add a new AdView as it is shown below:
<?xml version="1.0" encoding="utf-8"?>
<LinearLayout xmlns:android="http://schemas.android.com/apk/res/android"
    xmlns:ads="http://schemas.android.com/apk/lib/com.google.ads"
    android:layout_width="fill_parent"
    android:layout_height="fill_parent"
    android:orientation="vertical" >

    <TextView
        android:layout_width="fill_parent"
        android:layout_height="wrap_content"
        android:text="@string/hello" />

    <com.google.ads.AdView
        android:id="@+id/adview"
        android:layout_width="fill_parent"
        android:layout_height="wrap_content"
        ads:adSize="BANNER"
        ads:adUnitId="a1501676c633fac"
        ads:loadAdOnCreate="true"
        ads:testDevices="TEST_EMULATOR, TEST_DEVICE_ID"
        />
</LinearLayout>
Now add the Google AdActivity as well as both necessary permissions ACCESS_NETWORK_STATE and INTERNET to your AndroidManifest.xml file as it is shown here:
<?xml version="1.0" encoding="utf-8"?>
<manifest xmlns:android="http://schemas.android.com/apk/res/android"
    package="at.smartlab.androidbook.AdMobTest"
    android:versionCode="1"
    android:versionName="1.0" >

    <uses-sdk android:minSdkVersion="15" />

    <application
        android:icon="@drawable/ic_launcher"
        android:label="@string/app_name" >
        <activity
            android:name=".AdMobTestActivity"
            android:label="@string/app_name" >
            <intent-filter>
                <action android:name="android.intent.action.MAIN" />
                <category android:name="android.intent.category.LAUNCHER" />
            </intent-filter>
        </activity>

        <activity android:name="com.google.ads.AdActivity"
                  android:configChanges="keyboard|keyboardHidden|orientation|screenLayout|uiMode|screenSize|smallestScreenSize"/>
    </application>

    <uses-permission android:name="android.permission.ACCESS_NETWORK_STATE"/>
    <uses-permission android:name="android.permission.INTERNET"/>
</manifest>
To receive ads from AdMob you have to create an AdRequest instance within your own Activity and hand it over to your AdView layout element, as it is shown below:
package at.smartlab.androidbook.AdMobTest;

import com.google.ads.AdRequest;
import com.google.ads.AdView;

import android.app.Activity;
import android.os.Bundle;

public class AdMobTestActivity extends Activity {
    /** Called when the activity is first created. */
    @Override
    public void onCreate(Bundle savedInstanceState) {
        super.onCreate(savedInstanceState);

        setContentView(R.layout.main);

        // Look up the AdView as a resource and load a request.
        AdView adView = (AdView)this.findViewById(R.id.adview);
        adView.loadAd(new AdRequest());
    }
}
AdMob Test Mode:
During testing, you should set your AdMob AdView to a so called test mode, in order to receive an advert in any case. Otherwise it could take some time for AdMob to receive your requests and update the adverts in lifemode. To register your Android emulator as well as your real test devices, just enter your test device IDs (hint: find your own test device IDs within the debug output of your LogCat Eclipse View) in your AdView xml layout element, as it is shown below:
<com.google.ads.AdView
        android:id="@+id/adview"
        android:layout_width="fill_parent"
        android:layout_height="wrap_content"
        ads:adSize="BANNER"
        ads:adUnitId="a1501676c633fac"
        ads:loadAdOnCreate="true"
        ads:testDevices="TEST_EMULATOR, your test device ID goes here"
        />
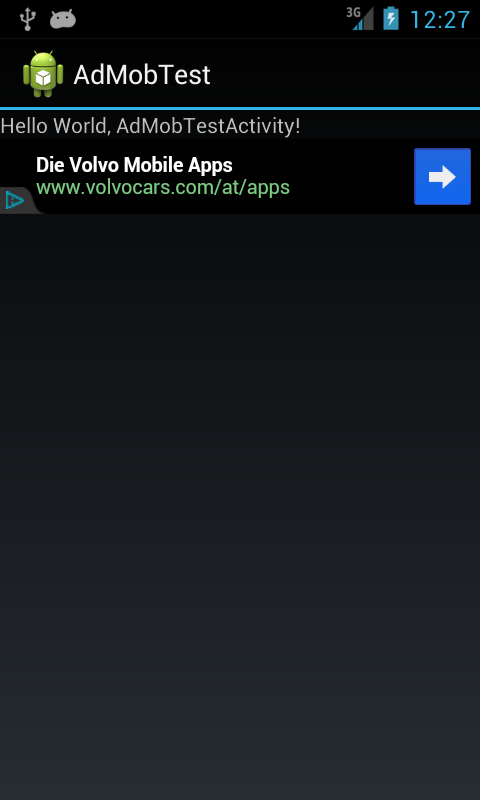
The resulting Android app shows the demanded advert in combination with a HelloWorld TextView:
You can download the full example project from here:
A problem i encountered during testing my mobile ad was that when i changed the advert from test mode to life mode the admob server returned following error message: ‘no fill. server replied that no ads are available’I checked several possible failures and after a while magically the adverts appeared correctly.
If this message appeares it can have different reasons:
- No network connection, or the wrong network connection.
- Check if your publisher ID is correct and that the connected ad is also present within the Admob Web dashboard.
- Wait some minutes, according to the fact that Admob needs some time to realize your requests
AdMob Missing Library Problem:
java.io.IOException: An established connection was aborted by the software in your host machine
Caused by: java.lang.ClassNotFoundException: com.google.ads.AdView
Solution:
Create a /libs directory in your Android project root folder. Then copy the AdMob Android SDK library jar into this folder and add it to the build path by right-clicking on the project and selecting Build Path > Add External Archives…
AdMob Missing AdSize Argument Problem:
Could not initialize AdView: Required XML attribute “adSize” missing
Caused by: com.google.ads.internal.b: Required XML attribute “adUnitId” missing
Solution:
Add following XML namespace to your layout xml file:
xmlns:ads=”http://schemas.android.com/apk/lib/com.google.ads”
Add following XML elements to your AdView layout element:
ads:adSize=”BANNER”
ads:adUnitId=”your Publisher ID comes here”



Leave a Reply