Retrofitting existing electrical installations with some degree of additional home automation capabilities is a cumbersome activity. Most of the time, the fixed wired installations do not support adding the necessary home automation wires. Even if there is enough space for your home automation wires, the installation routes often do not end where your home automation server is located.
Long story short, my goal was to get a state change in my Home Assistant server whenever my front door is activated by detected motion.
In the absence of a wired solution, I found a quite simple and low cost solution that I will share within the remainder of this blog.
The same approach can be used for many other purposes and it definitely adds additional smartness to your existing traditional electrical installation.
Use a cheap ESP8266 board send a MQTT message
The idea is extremely simple. Instead of using any complex logic or sensors, we will program the WLAN connected ESP8266 board to always send a MQTT message in a loop when it’s powered on.
That simple behavior can be used on the Home Assistant side to decide in a so-called binary sensor if the board is running or not.
Then, we use the traditional motion enabled light as a sensor and power our ESP8266 board with the same cables as the light uses.
As a result, the ESP board is running when the light is on and it’s off when the light is off too.
The MQTT message is only received at the Home Assistant side if the motion light is on.
Hardware setup
The hardware setup is pretty cheap and simple. You need a 220 to 5V power supply module, as it is shown below, which sells under 5 USD per piece:
The ESP8266 board is shown below, which comes at a cost of around 5 USD per piece:
Wiring
Connect your motion lights power cables to the 220 to 5V module (and make sure that you ask a professional electrician to help you with that, as a wrong connection can result in deadly accidents)
The two output wires of 5V positive and ground go to the boards Vin and GND pins. That’s all wiring that is necessary.
Program your ESP board
In order to send a constant MQTT message to your MQTT broker, you can use the following Arduino code snippet below:
/*
* Select NodeMCU 0.9 for board configuration
*
* */
#include <ArduinoJson.h>
#include <ESP8266WiFi.h>
#include <PubSubClient.h>

#define MQTT_VERSION MQTT_VERSION_3_1_1
// Wifi: SSID and password
const char* WIFI_SSID = "YOUR_WIFI_SSID";
const char* WIFI_PASSWORD = "YOUR_WIFI_PWD";
// MQTT: ID, server IP, port, username and password
const PROGMEM char* MQTT_CLIENT_ID = "sensor2_dht22_s_buero";
const PROGMEM char* MQTT_SERVER_IP = "192.168.0.110";
const PROGMEM uint16_t MQTT_SERVER_PORT = 1883;
const PROGMEM char* MQTT_USER = "homeassistant";
const PROGMEM char* MQTT_PASSWORD = "YOUR_MQTT_PASSWORD";

// MQTT: topic
const PROGMEM char* MQTT_SENSOR_TOPIC = "/home/house/frontdoor/sensor1";

WiFiClient wifiClient;
PubSubClient client(wifiClient);

#include <ArduinoJson.h>

void publishData() {
 // create a JSON object
 // doc : https://github.com/bblanchon/ArduinoJson/wiki/API%20Reference
 StaticJsonBuffer<200> jsonBuffer;
 JsonObject& root = jsonBuffer.createObject();
 // INFO: the data must be converted into a string; a problem occurs when using floats...
 root["movement"] = "1";
 root.prettyPrintTo(Serial);
 Serial.println("");
 /*
    {
       "movement": "1" ,
    }
 */
 char data[200];
 root.printTo(data, root.measureLength() + 1);
 client.publish(MQTT_SENSOR_TOPIC, data, true);
 yield();
}

void connect() {
 Serial.println("INFO: Attempting MQTT connection...");
 // Attempt to connect
 if (client.connect(MQTT_CLIENT_ID, MQTT_USER, MQTT_PASSWORD)) {
   Serial.println("INFO: connected");
 } else {
   Serial.print("ERROR: failed, rc=");
   Serial.print(client.state());
   Serial.println("DEBUG: try again in 5 seconds");
   // Wait 5 seconds before retrying
   delay(5000);
 }
}

void setup() {
 // init the serial
 Serial.begin(115200);

 // init the WiFi connection
 Serial.println();
 Serial.println();
 Serial.print("INFO: Connecting to ");
 WiFi.mode(WIFI_STA);
 Serial.println(WIFI_SSID);
 WiFi.begin(WIFI_SSID, WIFI_PASSWORD);
 int count = 0;
 while (count < 25 && WiFi.status() != WL_CONNECTED) {
   delay(500);
   Serial.print(".");
   count++;
 }

 Serial.println("");
 Serial.println("INFO: WiFi connected");
 Serial.println("INFO: IP address: ");
 Serial.println(WiFi.localIP());

 // init the MQTT connection
 client.setServer(MQTT_SERVER_IP, MQTT_SERVER_PORT);
 connect();
}

void loop() {

 // if MQTT lost connection then reconnect
 int count = 0;
 while (!client.connected()) {
   setup();
   if(count > 25) {
     ESP.restart();
   }
   count++;
 }
  delay(1000);
 client.loop();
  publishData();

 delay(5000);
 client.loop();
}
Receive the message in a Home Assistant Binary Sensor
Now that your board sends a constant MQTT message whenever it is powered up, we have to receive that message in Home Assistant and convert it into a convenient binary sensor value.
See below the configuration of the companion binary sensor (which goes into the configuration.yaml file) on the Home Assistant side that receives the MQTT motion light messages:
binary_sensor:
 - platform: mqtt
   name: "Front Door Sensor"
   state_topic: "/home/house/frontdoor/sensor1"
   value_template: '{{ value_json.movement }}'
   payload_on: "1"
   payload_off: "0"
   device_class: motion
   # automatically set the binary sensor to unavailable after 1 minute
   expire_after: 60
The important part above is to not forget the ‘expire_after’ setting that allows the binary sensor to reset to the ‘unknown’ state after 60 seconds of not receiving any MQTT update.
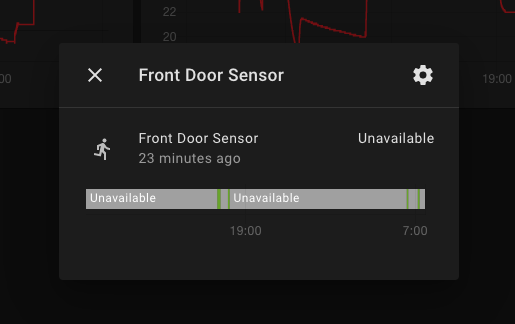
Chart your motion light activity
Now that you have a binary sensor defined, you can easily follow your motion light activity over time, as it is shown in the screenshot below:
Summary
By connecting a cheap ESP board to any of your traditional electric installations it is easily possible to retrofit your house with some additional smartness.
Connecting a ESP board directly with the power supply of your motion light allows you to seamlessly monitor its activation state over time.
The binary sensor in Home Assistant helps you to keep track and chart the motion state of your light over time and to easily set up any kind of automation on top, such as to record a short video of your front door in case the motion light goes on.
If you want to know more about cool Home Assistant projects, refer to my ebook on Home Assistant, shown below:


